How to Add or Update Bank Details on the GST Portal: If you’ve ever logged into the GST portal and been greeted with an error message like “Bank details not furnished or validated,” you’re not alone. Thousands of businesses—especially small and medium ones—have run into issues when trying to add or update bank details on the GST portal. The kicker? If your bank account isn’t validated, you can’t file your GSTR-1 or claim refunds. That’s a big deal.
The process itself isn’t hard. But getting it wrong? That can lead to delays, compliance issues, or even penalties. So in this comprehensive guide, we’ll break down the entire process—from start to finish—so you can update your bank details on the GST portal without errors. Whether you’re a freelancer in California, a consultant in Texas, or a business owner in Ohio, this guide is tailored for you.
How to Add or Update Bank Details on the GST Portal?
In 2025, compliance under Rule 10A has become stricter than ever. Updating or adding your bank details on the GST portal is no longer optional—it’s required for filing, refunds, and keeping your registration active. With this guide, you now know the exact steps to take, what to avoid, and how to stay on the right side of the law. Don’t let a missing bank validation derail your business. Take 15 minutes, follow the steps, and secure your GST account today.
| Key Information | Details |
|---|---|
| Topic | How to Add or Update Bank Details on the GST Portal |
| Legal Requirement | Rule 10A of the CGST Rules |
| Deadline | Within 45 days of GST registration or before filing first GSTR-1 |
| Document Requirement | Cancelled cheque, bank statement, or passbook (PDF or JPEG, max 100 KB) |
| Portal for Filing | www.gst.gov.in |
| Verification Method | DSC for LLPs/Companies; OTP/EVC for others |
| PFMS Validation | System validates account details via Public Financial Management System |
| Processing Time | Usually 7 working days |
| Non-Compliance Impact | GSTR-1 blocked, refunds withheld, possible cancellation under Rule 21(d) |
| Official User Guide | GST Registration Amendment – Bank Details |
What’s New in 2025?
In 2025, the GST portal has tightened the rules around bank account validation. Starting from September 1, 2024, taxpayers will not be allowed to file GSTR-1 or IFF (Invoice Furnishing Facility) if they haven’t added and validated their bank details.
Also, validations are now fully integrated with the PFMS (Public Financial Management System). This means your details are checked in real-time for accuracy—account holder name, IFSC, and PAN linkage.
That’s why updating your bank info early (and correctly) is no longer just good practice—it’s essential.
Who Needs to Update Bank Details?
Everyone with a GST registration who hasn’t validated their bank account yet. That includes:
- New businesses registered after April 2019
- Businesses that changed their primary operating bank
- Taxpayers who filed refunds and were rejected due to invalid bank data
- Exporters looking to claim ITC refunds
- Any taxpayer whose bank merged or IFSC changed due to banking reforms
Exceptions include:
- TDS/TCS deductors
- Non-resident taxable persons
- Suo-moto registered taxpayers under Rule 16
Why Is Bank Validation So Important?
Let’s be real—there’s no point claiming refunds if the money can’t reach you.
A validated bank account is mandatory for:
- Filing GSTR-1 from September 1, 2024
- Getting GST refunds
- Avoiding cancellation under Rule 21(d)
- Receiving notices and automated alerts from the GST portal
According to the Central Board of Indirect Taxes and Customs (CBIC), over 150,000 refund applications were delayed in FY 2023-24 due to unverified bank accounts.
When Should You Update Bank Details?
You need to add or update bank details immediately in the following cases:
- You’ve opened a new bank account for your business
- The old account has been closed or deactivated
- Your bank merged and IFSC code changed
- Refunds were rejected due to invalid/mismatched details
- You’ve updated the PAN or business name linked to GST
What You’ll Need Before Updating?
Gather the following before logging into the portal:
- GSTIN, username, and password
- Access to registered email or mobile for OTP
- Accurate bank account number and IFSC code
- A supporting document (must be clear and under 100 KB):
- Cancelled cheque (preferably with pre-printed name)
- First page of passbook
- Latest bank statement
Step-by-Step Guide: How to Add or Update Bank Details on the GST Portal
Step 1: Login to the GST Portal
- Visit www.gst.gov.in
- Click on “Login” and enter your credentials
- Complete OTP verification if prompted
Step 2: Navigate to Registration Amendment
- Go to “Services”
- Select “Registration”
- Click “Amendment of Registration (Non-Core Fields)”
- Choose the “Bank Accounts” tab
Step 3: Add or Edit Your Bank Details
- Click “Add New” to add a fresh account
- Click “Edit” next to an existing account to modify
Enter the following:
- Account Number
- IFSC Code (ensure it’s accurate)
- Type of Account (Savings/Current)
- Account Holder Name (must match the PAN/business name on record)
Once you enter IFSC, the bank name and branch details will auto-fill.
Step 4: Upload Supporting Document
Upload a clear copy of:
- A cancelled cheque, OR
- The first page of your passbook, OR
- A recent bank statement
The document must show:
- Account number
- IFSC code
- Business/PAN holder’s name
Ensure the file is:
- PDF or JPEG format
- Under 100 KB in size
- Clear, readable, and uncropped
Step 5: Validate and Save
Click the “Validate Account Details” button. The system verifies your information through PFMS.
If validation is successful:
- You’ll see a message: “Bank Details Validated Successfully”
- Click “Save and Continue”
If it fails:
- Check for name mismatch, incorrect IFSC, or invalid account number
- Correct and revalidate
Step 6: Submit Application
- Go to the Verification tab
- Tick the declaration box
- Select your verification method:
- DSC (for LLPs and Companies)
- OTP/EVC (for sole proprietors, partnerships)
Click “Submit.”
You will receive an ARN (Application Reference Number) to track the status.
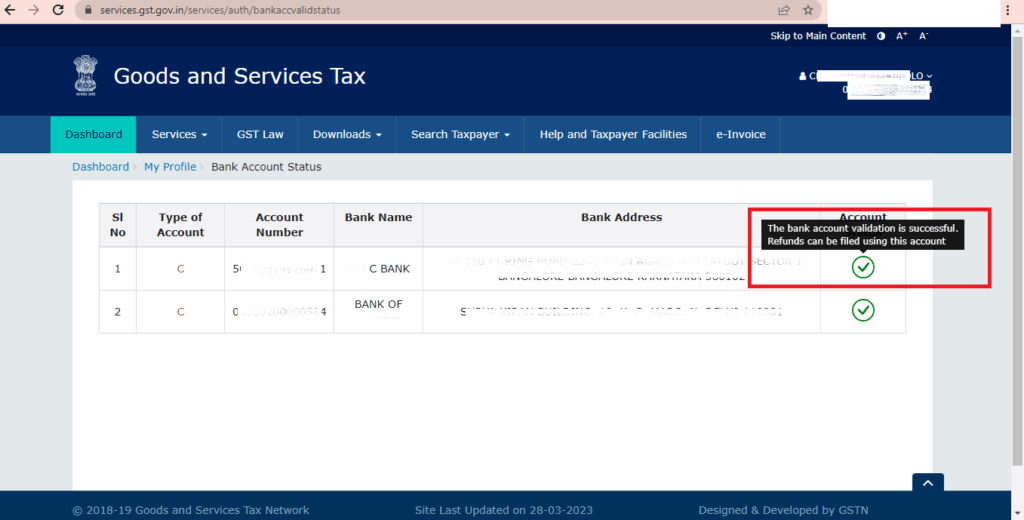
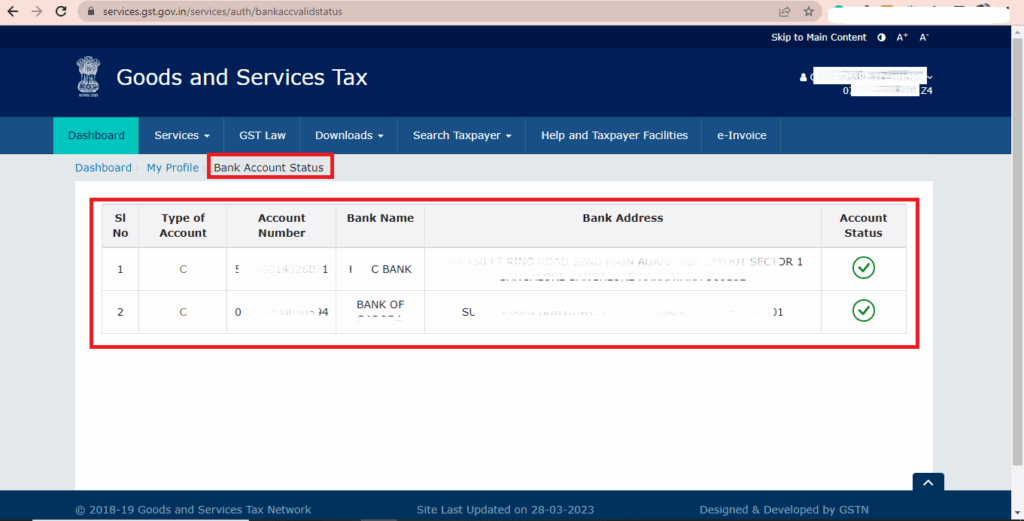
How to Check Bank Validation Status?
After submission:
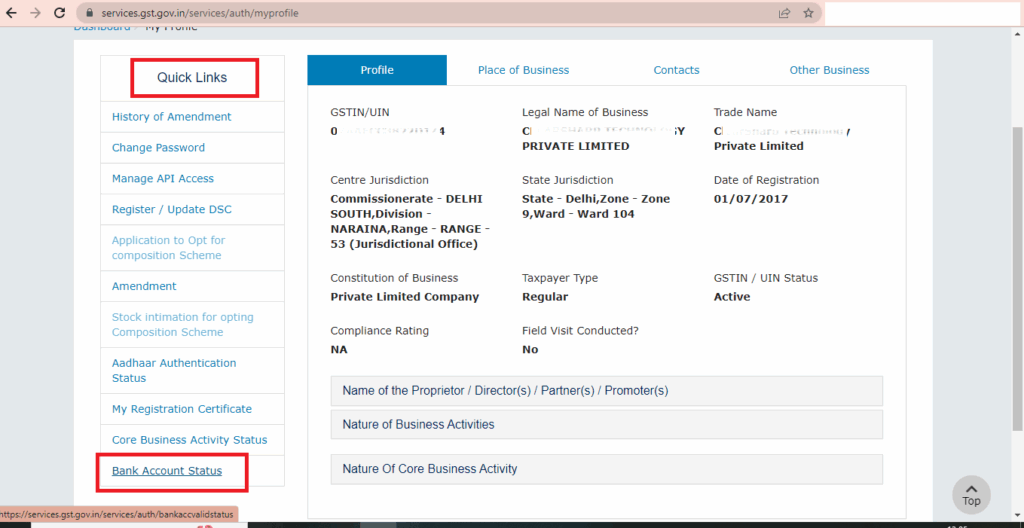
- Login to gst.gov.in
- Go to “My Profile”
- Click on “Bank Account Status”
You’ll see one of the following:
- Success – Bank validated, eligible for refunds
- Success with Remarks – Minor issues (like name abbreviation); may revalidate
- Failed – Invalid account or mismatch; must correct and resubmit
You get two revalidation attempts only.
Common Mistakes and How to Avoid Them
| Mistake | How to Avoid |
|---|---|
| Entering the wrong IFSC | Use RBI’s IFSC Finder |
| Uploading blurry or oversized docs | Scan clearly and compress to under 100 KB |
| Using a personal/joint account | Always use an account in the name of your business or GST-registered PAN |
| Not validating before submission | Always click “Validate” before final submission |
| Revalidating without corrections | Fix issues before using up your two revalidation chances |
Real-Life Example: Refund Blocked Due to Bank Error
In 2024, a startup in Kansas City applied for a $4,500 GST refund. Their bank account name didn’t match their business PAN. Result? The refund was held up for over 6 weeks. After correcting their bank name and uploading a new cheque, the refund was released—but only after weeks of follow-up.
Lesson learned: Ensure your bank name matches exactly with what’s listed in your GST registration and PAN records.
Telangana High Court Delivers Major Relief for NRSC in GST Dispute
GST Portal to Be Down August 2–3 — Check Exact Hours Before Filing
GST Collections for July 2025: You Won’t Believe Which State Tops the List!
Pro Tips from Tax Experts
- Always use a business account with a pre-printed cheque to avoid document rejection.
- Keep a dedicated account just for GST refunds—helps with reconciliation.
- Update the GST portal immediately after changing your bank.
- Avoid waiting until GSTR filing deadlines. Add or update bank details well in advance.

